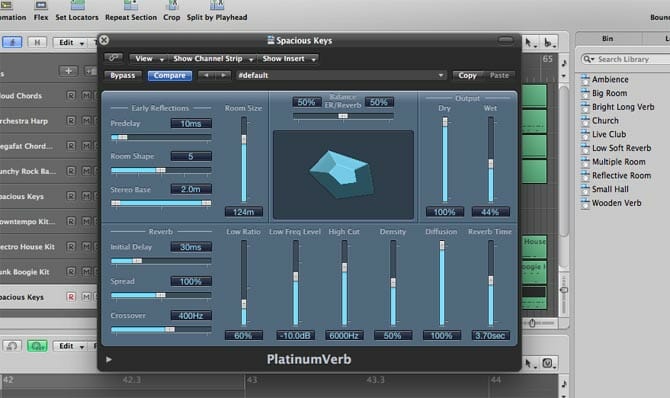
This article isn’t an in-depth introduction to reverb, but more an explanation to beginners in the audio industry as to why it’s such an important effect that you’ll almost certainly find yourself using again and again. As a sound designer I find that I use reverb almost daily in my work and without it I’d struggle to create realistic sound effects.
Reverb is an effect that reproduces reverberation, the continuation of a sound after the sound was produced due to the original dry signal reflecting many times from surfaces and objects and the decay of these reflections due to absorption from these objects. There are many factors involved in how big or small a reverb will sound and how it will sound in terms of brightness. Imagine if you clap you hands in a small room (maybe your bedroom). The sound will be short and snappy and it will probably be slightly louder and ‘echoey’ compared to if you clapped your hands outside in a field with no other objects around. Now imagine if you clapped your hands in a church. You know you’ll hear a long reverberation of the sound bouncing around all the walls, but the distance between those walls will be massive, so the tail of will be longer than your bedroom. All the energy produced (soundwaves) from you clapping your hands will bounce around those walls until it is absorbed and dies off.
The type of sound produced originally, the surfaces the sound also bounces around and is absorbed by determine how bright or dull the reverb will be and also how quickly the brightness may be reduced over the course of the tail off. The distance between the original sound source and the reflective surfaces also determine how quickly you’ll hear the reverb (pre-delay).
Our brains do a very good job at recognising this phenomenon and use it to calculate the distance of a sound source. Imagine someone standing in front of you in a room and clapping there hands. The actual sound of them clapping, not the reflected reverb (the dry signal) will reach your ears before any reverberation as they are close. If they then stood back and clapped, the further away they are, the less direct sound will reach you first and will be mixed with the reflected sound. This is one of the ways our brains calculate distance of a sound source, and also the environment it’s within.
A sound that is further away will also lose some of it’s brighter sound (higher frequencies) due to the nature of the high frequency sound wave (it’s smaller, weaker and more compact and loses strength quicker over time compared with low frequency sound waves). Again our brains will use the frequency and reverb to calculate distance (and also spatial placement of a sound source) in relation to us, the listener.
There is a lot more to it than this (you may want to also research the effect of our outer ear, the pinna, and how this plays a role too).
A standard reverb plugin will have parameters that will help you to re-create distance and environment and learning how to use them can really help you achieve great sounding sound effects. Here is a very quick and brief overview.
The time to which the listener hears the reflected signal. So in a very small room, this would be set to very low, or maybe even zero. It takes very little time for a sound to hit an adjacent wall and bounce back (mixed with the dry signal) if that wall is only a couple of metres away.
The decay time measured in seconds. A larger room or envirnment will have a longer reverb time than a smaller one.
This refers to the rate at which the reverb reflections will build in density. An environment with many surfaces at different angles will likely diffuse a sound source refelctions much more than a room with less and smoother surfaces.
This controls the density of the reflections in the reverb. The denser the reverb the smoother and more natural it will sound. This parameter may not be present on cheaper reverb effects but if you have it, experiment with it.
These relate to controlling the low or high frequencies in the reverb tail. As specified before, some reverbs will have higher or lower frequencies in the tail off due to the size of the environment, the surfaces the sound is reflecting from or the original sound source. You can use low and high levels to control these and shape the reverb accordingly.
A basic reverb effect unit or plugin will provide just a mix. This refers to the mix between the dry (unprocessed sound) and the wet (processed sound).
More advanced reverbs will have this parameter and it’ll allow you to change the angles of the reflective surfaces and thus how the reverb acts within the space. You may also see a ‘room size’ parameter, which simply allows you to set the distance between the surfaces of an environment.
You’ll quickly learn the importance of using reverb effectively in your work as a sound designer. Or if you’re a filmmaker using sound effects in post production, you’ll know there is no ‘one size fits all’ sound and sometimes you’ll need to manipulate a sound to fit your work. Using reverbs well can help you create realistic environments in your work and will bring them to a whole new professional level.
Download SFX
Checking your download limits
Add to list
Please select the list to add to.
List Details